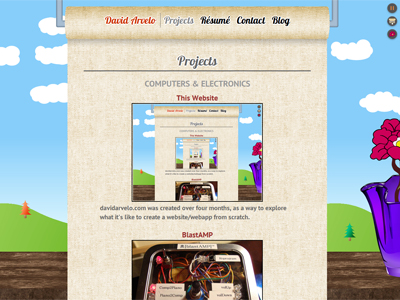
davidarvelo.com
This is going to be a long-winded article about how my web portfolio, davidarvelo.com, was created. It’s about to get heavy!
Overview
In the beginning, I created two domains. davidarvelo.com, and arvelocity.com. One was to be my portfolio, and the other, a blog. Goodness, The Odd Couple theme song is playing in my head now. Anyway, arvelocity was always destined to be my WordPress blog; I had an artistic concept for davidarvelo to literally be a window to my geeky exploits:
The browser window/tab is the window. At the bottom is a wooden windowsill with a movable vase. In the background are animated clouds, floating across the sky over rolling hills, and in the foreground is a window shade that acts as both the navigation menu and the content of the page. When you click on a link, the shade will fade out the content, roll to the size of the new content, and fade this new content back in. Clicking the flap or the loop at the bottom of the shade will roll it all the way back up, taking you back to the homepage. I had no idea how the site would actually look once it was done, but I think it turned out pretty good.
CSS and Graphics Design
The CSS styling attempts to remain fairly consistent across browsers. Graphics are used in place of box-shadows and linear-gradients where browsers don’t support them, and rgba degrades to solid color. This is all done with style rules based on Modernizr, and also works on browsers without JavaScript by using a “no-js” html class attribute. Browsers without JS will also not see what I call “controls,” those elements at the top right of the page which manipulate things on screen, since they are generated by JavaScript.
The graphics themselves were all created by me, with two-and-a-half exceptions. The completely awesome Dave McNally over at tileabl.es has provided six amazing texture packs that are, you guessed it, tileable and completely free to use. I used four images from his wood, rust, and fabric compilations to give texture to the site — two wood, one rust, and one fabric tile. Unfortunately since I didn’t save much of my very early work, I’m not sure of one wood and rust tile I used, but I’ll give you an idea with a sample of each pattern:
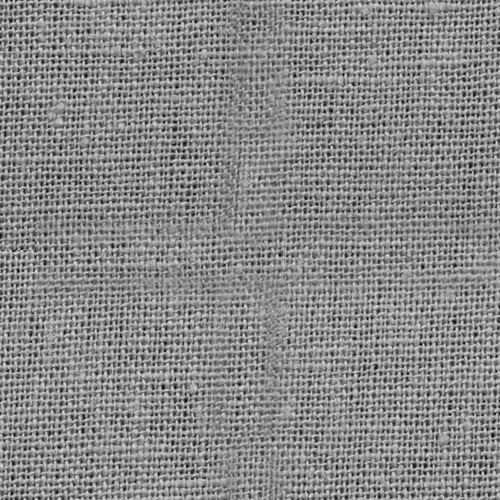

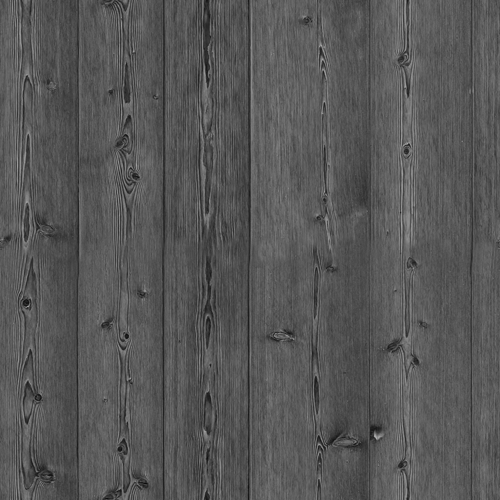
I colored and adjusted each image to look as they do on the site today. The rust image was combined with the lost wood image in a 3D rotation to give the impression of a windowsill, and the fabric was used in the shade itself and as a building block for the window shade roll image and its corresponding gif animation when links are clicked. The last stock image I used was one found on Google Images, but don’t worry, I didn’t steal it!

I traced this image out by hand to produce a vectorized version for the site, which could be scaled to any size and constitutes a work of its own. I was really proud of this one. The flower image is actually from a teapot that I own. I took a picture of it and made a vector version of that as well. Every graphic otherwise on the site was made from a blank digital canvas.
The fonts are courtesy of Google Web Fonts, and I was lucky to find them! With literally thousands of fonts to choose from on the web, the Web Fonts service was easy, and I think the ones I chose fit well (Lobster and PT Sans, for the curious).
PHP
Okay, here’s where we get technical! I didn’t initially plan on learning PHP, but when I decided to go the AJAX route, I found it was necessary. Using the REST HTTP methods of GET and POST, a web developer is able to leverage the capability of HTTP to send content from the server to the browser using the JavaScript XMLHttpRequest object, which can allow the insertion of content into a web page without navigation away from that page. Using this, I was able to achieve the effect of the rolling window shade.
Having a site with navigable AJAX links requires the development of a complex URL state machine. I wrote this state machine so that on browsers with the HTML5 History API, URLs would look identical to the URLs as they are browsed on no-JS browsers. Browsers with the onhashchange event, but without the HTML5 History API, require the use of the hash # character in the address bar for an indication of where the user is on the site. I opted to follow Twitter’s method of using a hashbang path /#!/ in the address bar to more easily parse the location in code. Though this is more related to JavaScript, it’s key to functionality in the following paragraph.
Even though the purpose of AJAX is to provide dynamically-generated content, I was also able to use PHP to make my pages accessible to people whose browsers have JavaScript disabled, as well as search engine crawlers. This gives the site the most flexibility and allows my web pages to be indexed by search engines whose crawlers don’t use JavaScript (basically all of them). Web crawlers are given access to each web page either through the native URL (without any hash), or through Google’s method of the ?escaped_fragment, which was worked into the design to allow crawling of links to the site that contain a hashbang. (Told you I’d get back to that, didn’t I?) The escaped fragment value is R301 redirected by the server to the normal, clean URL. This gives the search engine an indication to use this clean URL for its search results, rather than the one with the hashbang.
My Apache .htaccess file is configured to send any page request to index.php as GET request variables. All attempts to access a page on the site are validated by PHP against a MySQL database of valid page hierarchy, also sent by my PHP code as a JSON object to provide front-side validation on AJAX loads. Essentially, there is only one true web page, index.php, and whether the user is browsing without JavaScript or with AJAX, the <div id="content"> area is filled with the content requested by the user. Page content (HTML) requested that isn’t from the landing page, index.php, is stored in a structured, non-public location on the server and the content is only relevant to the page itself, containing none of the HTML from the index.php page. This makes the site easy to maintain and its pages less redundant. Each page can contain its own scripts or PHP.
A requested page on my site can also be specified in the database as belonging to a WordPress blog article. If so, the page content is instead pulled straight from the WordPress database, formatted, and injected into <div id="content">. I was very happy to be able to repurpose some of the WordPress source code for the formatting of the articles. This way, I can write any blog article on http://arvelocity.com and choose to share it directly within the portfolio site itself. Less redundancy, more flexibility in this case as well.
In the Contact page, PHPMailer is used to forward messages to my email inbox. The information sent is also stored on a local database in case the mail server drops the email, which can be true for the particular third-party mail server I’m I was using. It seems to have very strict limits. I think it also enforces no cookies before bedtime, but I haven’t validated that claim, so don’t quote me on it.
JavaScript
The JavaScript piece is separated into three files, ajaxController.js, plugins.js, and script.js. The latter two are practices inherited from HTML5 Boilerplate, which has been a godsend in helping me create the site with the latest best practices. Paul Irish and Divya Manian are awesome!
ajaxController.js is a file of my own creation, and is loaded first. It attempts to properly interpret the URL in a page request and help redirect the user to the right page depending on whether the URL is malformed and whether their browser has the onhashchange event or the HTML5 History API included. ajaxController.js makes all this information available to script.js, which does the heavy lifting.
plugins.js includes any JavaScript code written by others that I plugged in to make developing the site easier. It consists of the safe log() function from HTML5 Boilerplate, Peter Higgins’ pubsub plugin for the JavaScript jQuery library, and the code for Slimbox 2, a jQuery plugin that simulates the original Lightbox plugin for Prototype and allows me to show fancy image galleries within the page.
script.js, as I said before, does pretty much all the front-end work. Its code is logically divided into six parts, some of which are tacked onto a DAscript JavaScript object namespace for communication between sections (in addition to the pubsub communication):
- Vase Drag ’n’ Drop jQuery Plugin - Allows the vase on the page to be played with.
- Cookies and Controls - Generates the controls on the top right of the page and allows their settings to be saved between site visits.
- Hijax - Determines browser AJAX capability, rewrites all links to the site into AJAX page loads, processes these page loads, and publishes events to the display portion of DAscript using the pubsub plugin.
- Display - Handles nearly every change to the layout and visual representation of the page.
- Messaging - Allows me to show interesting or critical information to the user that is relevant to their actions in a more natural and understandable way. I modeled it based on my user experience with Facebook’s popup messaging system. I like it.
- Clouds - Processes the animation and events occurring on the cloud objects in the virtual sky. Constitutes about 1/3 of the code in
script.js.
Vase Drag ’n’ Drop jQuery Plugin
This was my first jQuery plugin. I based its functionality on an article about how to use jQuery to make drag-and-drop elements and modified the code for my purposes, also interweaving it with the Cookies and Controls portion.
Cookies and Controls
All cookie values are returned from here and used by other sections as the user previously defined. Controls are generated and work both through CSS and JavaScript in the related sections.
Hijax
The meat and potatoes of how the site works. If it exists, the url to reroute from ajaxController.js is read and loaded here. Otherwise, content has already been loaded from the PHP. Links are intercepted and written to produce AJAX events if they are from the main site, otherwise they are made to open in a new window (since my site is so baller it needs its own tab), or if they are image links, are converted to image galleries with Slimbox. Any errors in AJAX loading are handled here and display changes or messages are handled by their respective logical counterparts in script.js.
Display
Almost all display changes are handled here, except in the case of one-liners or similar in the code that can be handled elsewhere. If an AJAX event occurs, this section knows how to load new content or, in the case of an error, reset it back to how it looked before. Since the loading of webfonts can change the flow of the document, any reflow of content is also handled here.
Messaging
The messaging system is meant to convey information that otherwise wouldn’t look right inserted into the page. A separate div is generated for messages, and information is displayed with a blue border, while any errors are displayed in a red border. Messages are handled with objects, and have a type, title, and HTML associated with the message being sent. Since messaging is handled with the publish/subscribe model, any section of the code in the site can display a message. Messages can be individually closed out, or an entire messagebox full of messages can be closed at one time. If a page takes more than two seconds to load, a loading message is displayed until the AJAX event completes. Each message type (loading, info, or error) has its own default timeout where the message fades out, but I made sure to include a custom timeout argument for the function in case a message is particularly important or takes a while to read.
Clouds
The first thing I ever seriously did with JavaScript and jQuery was create animated clouds on an empty page. It took me a while to create a system where a high-level controller was responsible for all cloud animation at certain intervals, but some time after it was finished I realized that the clouds would be better off responsibly animating themselves. I rewrote the whole functionality.
Cloud objects have their own prototype function for animation across the screen, and it’s much smoother now. This was the first time I experimented with prototypal inheritance in JavaScript. I learned that writing functions within an object itself can create bloat because each object and their descendant objects will have a copy of these functions in memory. Using prototypes will keep them lean. I also learned that setting animation timeouts outside of the jQuery animation function can have unpredictable effects if the user has the browser or tab outside of focus, and that there is a specific way to stack animations that are not part of the jQuery animation queue.
Browsers that don’t support the onhashchange event or the HTML5 History API will get the animated clouds and all controls except the window shade control, because they will instead navigate from page to page without AJAX.
I thought that CPU processing share would increase with each cloud added to the sky object, but was surprised to find that after a certain number, the CPU load remains fairly constant. I would be interested to find why that is, but I’m pretty happy about it anyways.
Conclusion
And so ends the discussion of how the site works. I didn’t get too deeply into the code, but tried to add as many explanatory comments into the code as I could as I feverishly worked to complete the site. Anyone is free to look at my github account for a greater understanding of its development. A lot of cleanup work still needs to be done, but at least for now I can get it out there. Better to act than strive to perfect in the short term, I think! I’ll leave you with some goodies.
Bonus: Goodies
- Clouds can be popped by clicking them. Try to get an empty sky without cheating by reducing the number of clouds! :)
- The vase and flower can be moved across the screen by clicking and dragging them around.
- The controls on the top right of the screen can pause the sky, add or remove clouds, disable the rolling window shade animation, and hide the flower or the sign on the hills.
- Clicking the flap or the little loop of the window shade rolls the shade back to the top and takes you back to the homepage.
As always, thanks for reading!
Comments